Frequently Asked Questions
How does one use the navX-MXP Java library?
Java
Update [1/7/2017]: The navX-MXP Java library for FRC has been updated to support the 2017 WPI Library.
To use the library, you can download the latest build of the libraries, or you can checkout the source code with Git. To learn more about the library, online help is available. If developing in a Linux or MacOS platform, you can download the cross-platform library package.
Getting Started
Before getting started, ensure you have installed Eclipse and the latest WPI Library Plugins.Several sample Java Robot Applications are provided. After running the setup program included in the latest build, the libraries and samples will be installed to the following location:
\navx-mxp\ (e.g., if your user name is Robot, the directory name will be C:\Users\Robot\navx-mxpWithin this directory, the “java\examples” directory contains several example programs. Select the example you wish to start with and import the sample project into the Eclipse IDE.
Configuring Eclipse Java Library Paths
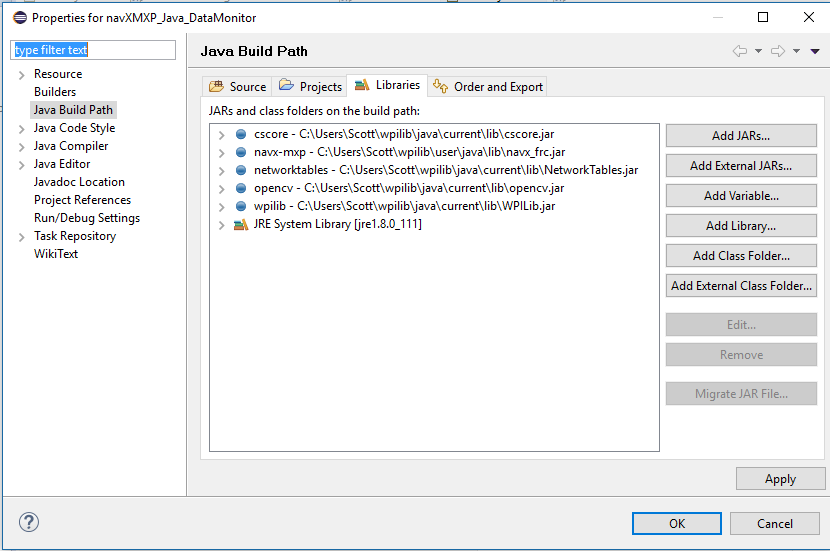
After running the setup program, the Java libraries are automatically installed to \wpilib\user\java\lib.A few small configuration changes must be made in order that the Java compiler can locate the navX-MXP library, and that this library will be included in the files that are downloaded to the RoboRIO:
1) Add a Java Build Variable for the navX-MXP Java Library. To set the build variable, from the Eclipse menu select Window->Preferences->Java->Build Path->Classpath Variables, then click on the “New…” button. Then, in the “New Variable Entry” dialog, set the name to “navx-mxp” and set the Path to \wpilib\user\java\lib\navx_frc.jar. Hit OK to save this change.
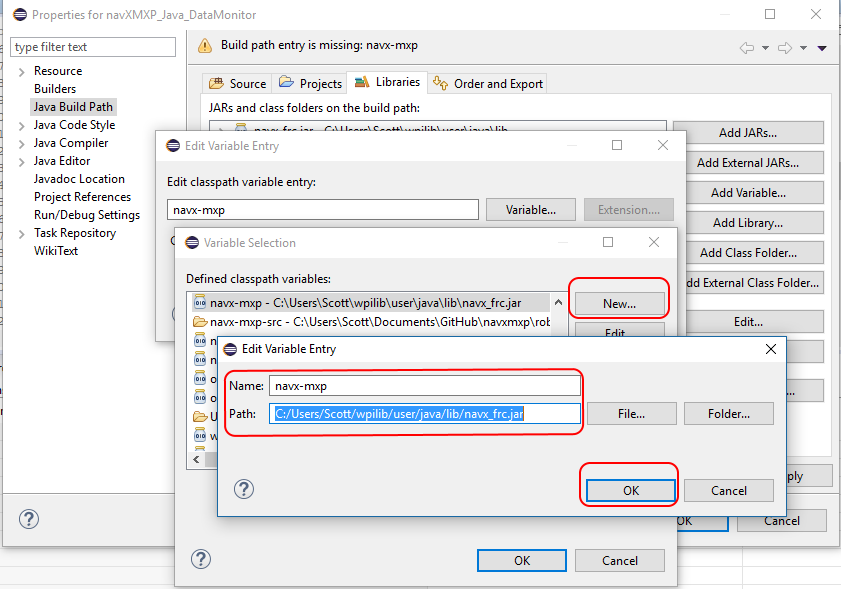
2) Ensure that your project’s library paths include the navx-mxp variable, as well as WPI library path variables (networktables and wpilib). If any are missing, you can add them by clicking on the “Add Variable…” button.
Next Steps
Once the java library paths are configured as indicated above, import the example projects into Eclipse, and then modify the constructor of the Robot.java file to specify your selected interface, as follows:ahrs = new AHRS(SerialPort.Port.kMXP); /* Alternatives: SPI.Port.kMXP, I2C.Port.kMXP or SerialPort.Port.kUSB */To better understand navX-MXP capabilities, the DataMonitor example is recommended. After compiling and downloading this example to the RoboRIO, the application will connect and sensor readings will be displayed in the DriverStation’s SmartDashboard display. This sample application’s OperatorControl() function demonstrates how to access navX-MXP sensor readings; more information is available in the online documentation for the AHRS class.
After getting the sample navX-MXP application running, please see the Examples section for a description and sample code which implements some key capabilities enabled by navX-MXP.
Stepping into the navX-MXP Java Library source code
If you would like to step into the navX-MXP Java Library source code, or set breakpoints in the library, configured Eclipse to provide the path to the source code which corresponds to the navx_ftc library as follows:- In the Eclipse Window->Preferences dialog, select Java->Build Path->Classpath Variables, then click on the “New…” button and in the “New Variable Entry” dialog click on the “Folder…” button and enter the location of the sources, which are installed at:
- C:\Users\\navx-mxp\java\navx_frc\src
- Set the name of this new variable to “NAVX_FRC_LIB”
- Next, in the Project Properties dialog, select “Java Build Path” in the tree on the left of the Properties dialog, and then on the “Libraries” tab select the “navx_mxp” library and expand the drop-down arrow. Click on the “Source attachment” item, then click on the “Edit…” button. When the “Source Attachment Configuration” dialog, enter the name of the New Variable (NAVX_FRC_LIB) created above and click on the “OK” button.
- To set a breakpoint in the navx_ftc library when debugging the robot application, step into the constructor of the AHRS class and then set a breakpoint in the code you wish to break at. When the breakpoint is hit, the debugger will stop in the corresponding location in the navx_ftc code.
Maven repository
If your robot application build process uses Maven, you can automate the process of receiving updated builds. To reference the navX-MXP Maven repository, edit your pom.xml file to include the following entries: ...
...
com.kauailabs.navx.frcnavx_frc[3.0,3.1]
...
...
...
kauailabs-mavenKauai Labs Maven Repositoryhttp://www.kauailabs.com/maven2
...
...
Last Updated 9 years ago